
In this post we shall discuss the process of Designing Clinical Study in Oracle Clinical using the Design subsystem.
Before you read this post you may be interested in reading the process of Planning a Clinical Study in Oracle Clinical
Already done that? Great. Let’s get started with the process of designing a clinical study. But before we do that let’s first lets have a look at the Components of a CRF as designed within the Oracle Clinical application.
Table of Contents
Components of CRF
The essential components of CRF that are used during study data definition and data entry are Discrete Value Groups (DVGs), Questions, Question Groups, Data Collection Modules (DCMs) and Data Collection Instruments (DCIs).
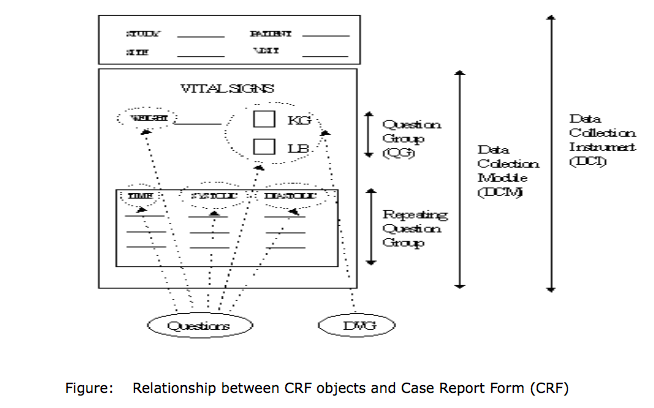
The order of definition of these CRF objects (DVGs, Questions, Question Groups, DCMs and DCIs) is an important feature of database set-up and preparation for data entry. Therefore before a Question Group can be used the Question must be defined. Also, before a DCM can be used the Question Group must be defined and so on.
Designing Clinical Study
Prerequisites:
- Ensure Planned Programs/Projects are created
- Ensure Organizational Units are created
- Ensure Regions are created
- Ensure Study is setup in Planned Studies
- Ensure Clinical Study Statuses are defined
For detailed steps on How to Planning a Clinical Study, refer to our previous post Planning a Clinical Study in Oracle Clinical
The Process of Designing a Clinical study can be broken down into the following tasks:
- Creating a Study using Easy Study Design
- Defining Study Intervals
- Defining Clinical Planned Events (CPE)
- Creating and Defining Treatment Patterns
- Creating Patient Positions
- Associating Investigators and Sites to a Clinical Study
Now that know what the key tasks in Designing Clinical Study are, lets talk a bit about what activities are performed within each task of Designing Clinical Study.
1. Creating a Study using Easy Study Design
To begin creating a study within Oracle Clinical navigate to the Menu path: Design > Studies > Easy Study Design. This opens the Easy Study Design Form as shown below.
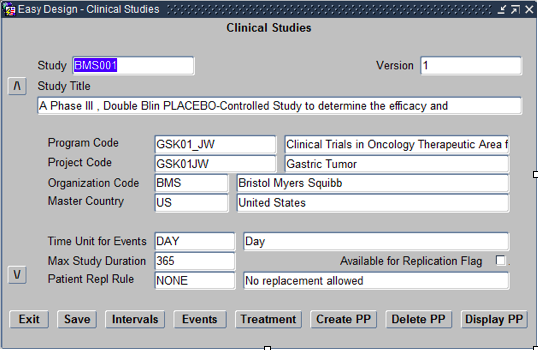
Within this form the following need to be defined:
- Study – Choose from List of studies already Planned.
- Version – Always Starts with Version 1
- Title – Title of the Study as per the Protocol. Autofills.
- Program Code – Program code should be based on the Therapeutic area
- Project Code – Project code should be based on the disease area
- Organisational Code – Choose the Sponsor of that clinical trial from list of values.
- Master Country – Choose the master country as the country where the trial will be filed for regulatory approval.
- Time Unit for Events – Choose Day or Hour depending on the study
- Max Study Duration – Choose the maximum time for the study based on the Time unit specified previously.
- Patient Replacement Rule – Choose NONE/No Replacement
2. Defining Study Intervals
The next step in Designing Clinical Study is to define Study Intervals. Intervals are Time periods into which a Study is divided. To define Intervals for your clinical study click on the Intervals navigation button on the Easy Study Design form.
This opens the Maintain Intervals form as shown below:
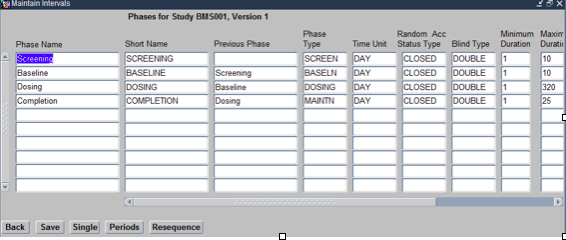
Within this form the following need to be defined.
- Phase Name: This includes a name Such as a Time Period Name, e.g., Screening Period
- Phase Type: These are types such as SCREENING, DOSING, BASELINE, etc into which the Study duration is divided.
- Blind Type: Choose Blind type as per the protocol.
- Minimum Duration: Study Specific based on the duration of time period and the time units
- Maximum Duration: Study Specific based on the duration of time period, based on anticipated maximum time.
3. Defining Clinical Planned Events (CPE)
The next step in Designing Clinical Study is to define Clinical Planned Events. Clinical Planned Events (CPE) are Visits into which a study is divided. During these visits the subjects will visit the Sites and get their data collected for that visit.
To defined the Events for the study click on the Events navigation button on the Easy Study Design Form. This opens the Maintain Events form as shown below:
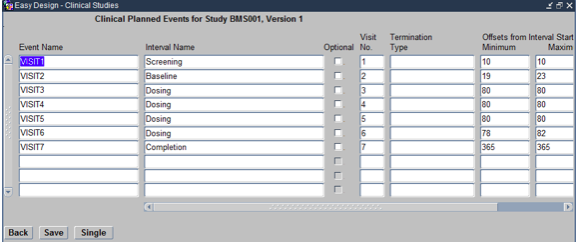
Within this form the following need to be defined.
- Event Name: This is the Same as Visit Name, for example VISIT 1
- Interval Name: This is Derived from previous Interval forms, use F9 for LOV,
- Visit #: This is the numeric value of the Visit as shown during Data Entry, for example 1 for VISIT 1
- Termination Type: This will be Early Termination for the first visit (VISIT 1) and Normal Termination for the last visit. The rest of the visits in the middle will have this filed left blank.
- Offsets Min: Relative to the Interval, minimum variation from the scheduled duration.
- Offsets Max: Relative to the Interval, maximum variation from the scheduled duration.
4. Creating and Defining Treatment Patterns
The next step in Designing Clinical Study is to define Treatment Patterns. Treatment Patterns are sequence of Treatments/Regimens that are given to the patients enrolled in a clinical study. Generally this includes the Investigational New Drugs as well as any controls to the Investigational New Drug like the Placebo that have to be tested on patients.
To defined the Treatment Patterns for the study click on the Treatments navigation button on the Easy Study Design Form.
Please remember that on this form you can only choose and assign existing treatment to the study. To define new Treatment Patterns you will first need to create them under the Menu Item Design > Treatment > Patterns and then associate them to the study using the above form.
5. Creating Patient Positions
The next step in Designing Clinical Study is to define Patient Positions. Patients are not identified in a clinical study by their name or other identifiable information. Hence each patient is allocated a Patient Identifier also know as a Patient Position by which he/she is identified and tracked in a clinical study.
To defined the Patient Positions for the study click on the Patient Positions navigation button on the Easy Study Design Form. This opens the Maintain Patient Positions form as shown below:
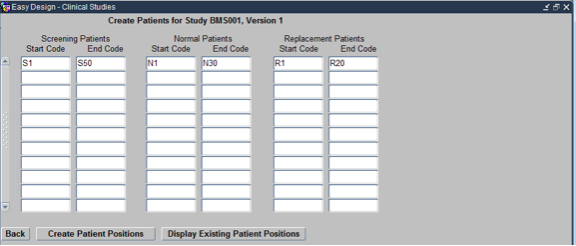
There are 3 types of patient positions. Screening Patient Positions, Normal Patient Positions and Replacement patient positions, depending upon whether they subject is being screened, has been enrolled or is a replacement to a dropped out patient respectively. Each of these has Start and end codes.
- Start Code: First Patient ID for the specific category of patients. S1 for Screening patients, N1 for Normal patients and R1 for replacement patients
- End Code: Last Patient ID for the specific category of patients. Sn for Screening patients, Nn for Normal patients and Rn for replacement patients, where n is the total number of patients in that category.
6. Associating Investigators and Sites to a Clinical Study
The next step in Designing Clinical Study is to define Sites, Investigators and Study Sites.
Investigators are Doctors participating in the Clinical Study and are created under Design > Investigators and Sites > Investigators
Sites are Hospitals participating in the Clinical Study and are created under Design > Investigators and Sites > Sites
Since the same Investigators and Sites may be participating in multiple clinical studies, many times their creating is not necessary when designing a clinical study as the same Sites and Investigates from previous studies may be used as per the protocol. However if an additional Site/Investigator needs to be created the same can be done using the Menu paths specified above.
However it is mandatory to associate Investigators and Sites to each Clinical study. To do this click on the Menu path Design > Investigators and Sites > Study Sites
The Maintain Study Sites Form opens up as shown below:
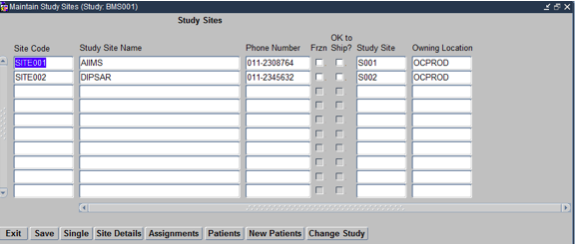
On this form we choose all the Sites that we would like to allocate to the Clinical Study. On Saving the Form each Site gets a Unique Study Site ID allocated to it. This helps isolate the involvement of a particular Site in a Specific Clinical Study.
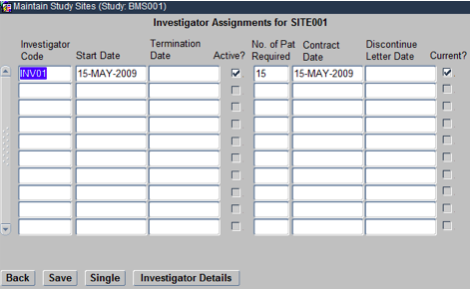
Once this is done, select each Site and click on the Assignments Navigation button. On the resulting Form choose the Investigator that you would like to associate to the Site as shown below. Similarly, follow the same steps for other Sites, to allocate Investigators to them.
Click Back to come back to the main screen of the Maintain Study Sites Form. Now, select a Site and click on the Patients navigation button. On the resulting Form check mark the Patient IDs that you would like to allocate to that Site as shown below. Similarly, of this for other Sites as well.
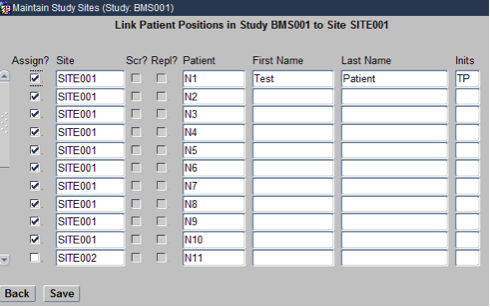
Now you have successfully associated Sites to the Study, Investigators to the Study Sites and Patients to the Study Sites.
This completes the process of Designing a Clinical Study within Oracle Clinical.
Should you be interested in learning this process via Multimedia Tutorials, Recorded Session, Quizzes while also getting access to the Oracle Clinical application for hands-on practical training, please enrol for our Oracle Clinical Fundamentals program.
You may be interested in…